1.0 Introduction
This article describes how to deploy Confidential AI workloads using Fortanix Confidential Computing Manager (CCM), Fortanix Data Security Manager (DSM), and Rafay. It combines the Fortanix attestation and key management capabilities with Rafay's infrastructure orchestration to securely deploy and run AI models and applications in trusted execution environments (TEEs).
1.1 Core Components
Fortanix CCM is used for attestation and policy enforcement.
Fortanix DSM is used for key management and Secure Key Release (SKR).
Rafay is used to orchestrate Confidential AI deployments.
2.0 Prerequisites
Before deploying Confidential AI workloads, configure the required Fortanix services and prepare the platform. The following prerequisites establish the trust relationship between Fortanix CCM and Fortanix DSM and prepare the infrastructure for confidential computing.
Access to Fortanix CCM.
Access to Fortanix DSM.
A Rafay account for Confidential AI orchestration.
A platform with an AMD SEV-SNP or Intel TDX-capable CPU with an NVIDIA GPU.
2.1 Configure Fortanix CCM
Fortanix CCM enables you to manage confidential computing workloads, applications, and infrastructure through its user interface (UI).
Configure your Fortanix CCM environment as described in Configure Fortanix CCM.
Secure Key Release (SKR) enables Fortanix DSM to release cryptographic keys only after Fortanix CCM verifies that the Confidential Virtual Machine (CVM) is running in a trusted and attested environment. As part of this workflow, download the Zone CA certificate from Fortanix CCM and upload it to Fortanix DSM to establish trust between the two services.
2.2 Configure Fortanix DSM
Fortanix DSM securely generates, stores, and manages cryptographic keys, certificates, and other secrets, such as passwords, API keys, and tokens.
Configure your Fortanix DSM environment as described in Configure Fortanix DSM for Secure Key Release.
To enable Secure Key Release, upload the Zone CA certificate downloaded from Fortanix CCM when configuring Fortanix DSM. This allows DSM to verify attestation information from CCM and release cryptographic keys only to trusted Confidential VM workloads.
2.3 Create a Key
Create the encryption key that will be used to encrypt and protect the model. This key is released only to trusted CVM workloads through Secure Key Release after successful attestation. For detailed instructions, refer to Encrypt and Decrypt the Model.
2.4 Configure the Platform for Confidential Computing
For prerequisites to enroll a compute node on a bare-metal AMD SEV-SNP platform, refer to Prerequisites.
For prerequisites to enroll a compute node on a bare-metal Intel TDX platform, refer to Prerequisites.
3.0 Deploy Confidential AI Using Confidential VM
This section describes how to deploy Confidential AI workloads as a Confidential VM. For example, a proprietary AI model and its inference application can be packaged into a virtual machine and converted into a Confidential VM before deployment. The converted CVM is attested by Fortanix CCM, receives cryptographic keys from Fortanix DSM through Secure Key Release, and is deployed securely using Rafay.
3.1 Generate Join Token
The Fortanix Node Agent software enables the registration of compute nodes to CCM when installed on a compute node. It assists in the verification of hardware and platform software running on compute nodes and application attestation. When deploying through Rafay, the Fortanix Node Agent is installed and registered automatically using the Fortanix CCM Join Token.
The Fortanix Node Agent runs on the compute node hosting the Confidential VM. During attestation, it communicates with Fortanix CCM, verifies the platform, and provides the application certificate to the Confidential VM after successful attestation.
Generate a Fortanix CCM Join Token. The Join Token is required when configuring the Confidential VM SKU in Rafay to enable automatic registration of the Fortanix Node Agent. For detailed instructions, refer to Generate Join Token.
3.2 Create the Confidential VM
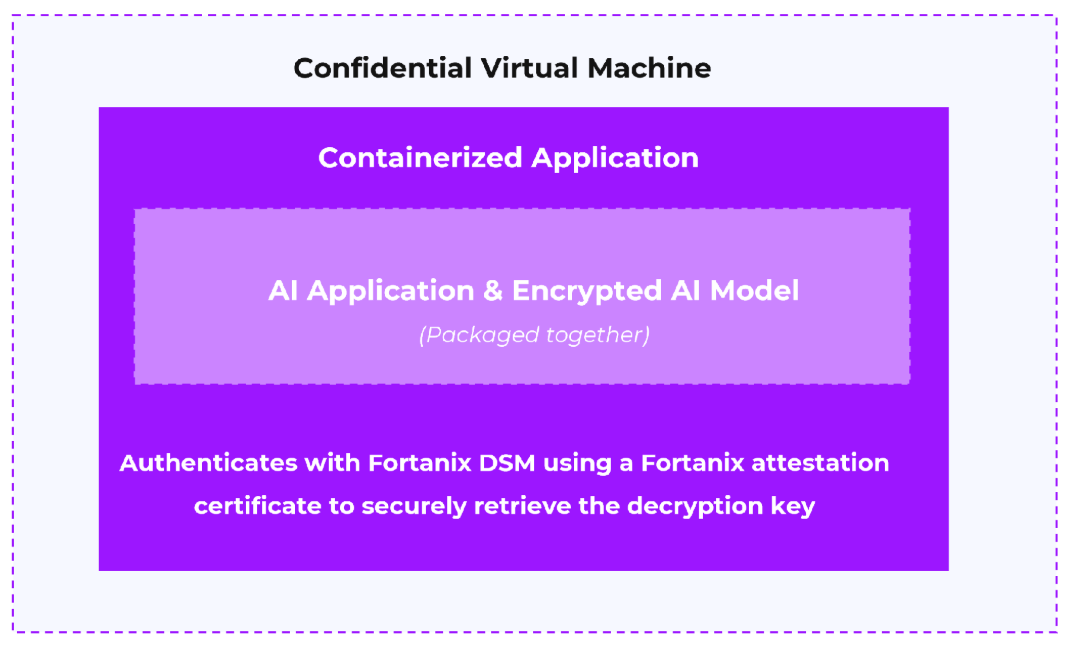
Figure 1: Create CVM
Create the Confidential VM image, calculate its measurements, and prepare it for deployment by following the procedures in the referenced documentation below:
Prepare the Build Machine that will be used to generate the CVM image. For detailed instructions, refer to Prepare the Build Machine.
Containerize the application together with the encrypted model. The application must use CCM-issued attestation certificates to authenticate with DSM and decrypt the model at runtime inside the CVM. For more information, refer to Containerize the Model.
Create a Confidential VM image for the target platform.
Calculate image measurements required for attestation.
3.3 Configure the Application in Fortanix CCM
Create an application image in CCM using the launch measurements generated from the Confidential VM image. The application image registers the Confidential VM image with CCM and enables the Confidential VM to be attested during deployment.
3.3.1 Create an Application in CCM
For detailed instructions on creating an AMD SEV-SNP application, refer to Add AMD Application.
For detailed instructions on creating an Intel TDX application, refer to Add Intel TDX Application.
3.3.2 Create an Application Image in CCM
Create an application image using the launch measurements generated in the Confidential VM image.
For detailed instructions on creating an AMD SEV-SNP application image, refer to Create Application Image.
For detailed instructions on creating an Intel TDX application image, refer to Create Application Image.
3.3.3 Create an Application Configuration
Create an application configuration to define the runtime settings for the application.
For detailed instructions to create an application configuration for AMD SEV-SNP app, refer to Create Application Configuration.
3.3.4 Create a CCM Workflow
Create a CCM workflow for the AMD SEV-SNP application and copy the Runtime configuration hash of the workflow application. This value is used as the Fortanix CCM App Config ID when deploying the Confidential VM in Section 3.5.4: Deploy the Confidential VM (Enterprise Admin).
For detailed steps to create a workflow for AMD SEV-SNP application image and copy the workflow application runtime configuration hash, refer to Create a Workflow – AMD SEV-SNP.
For detailed steps to create a workflow for Intel TDX application image and copy the workflow application runtime configuration hash, refer to Create a Workflow – Intel TDX.
After the CCM workflow is created, deploy the Confidential VM containing the AI application and encrypted model.
3.4 Attestation and Secure Key Release Flow
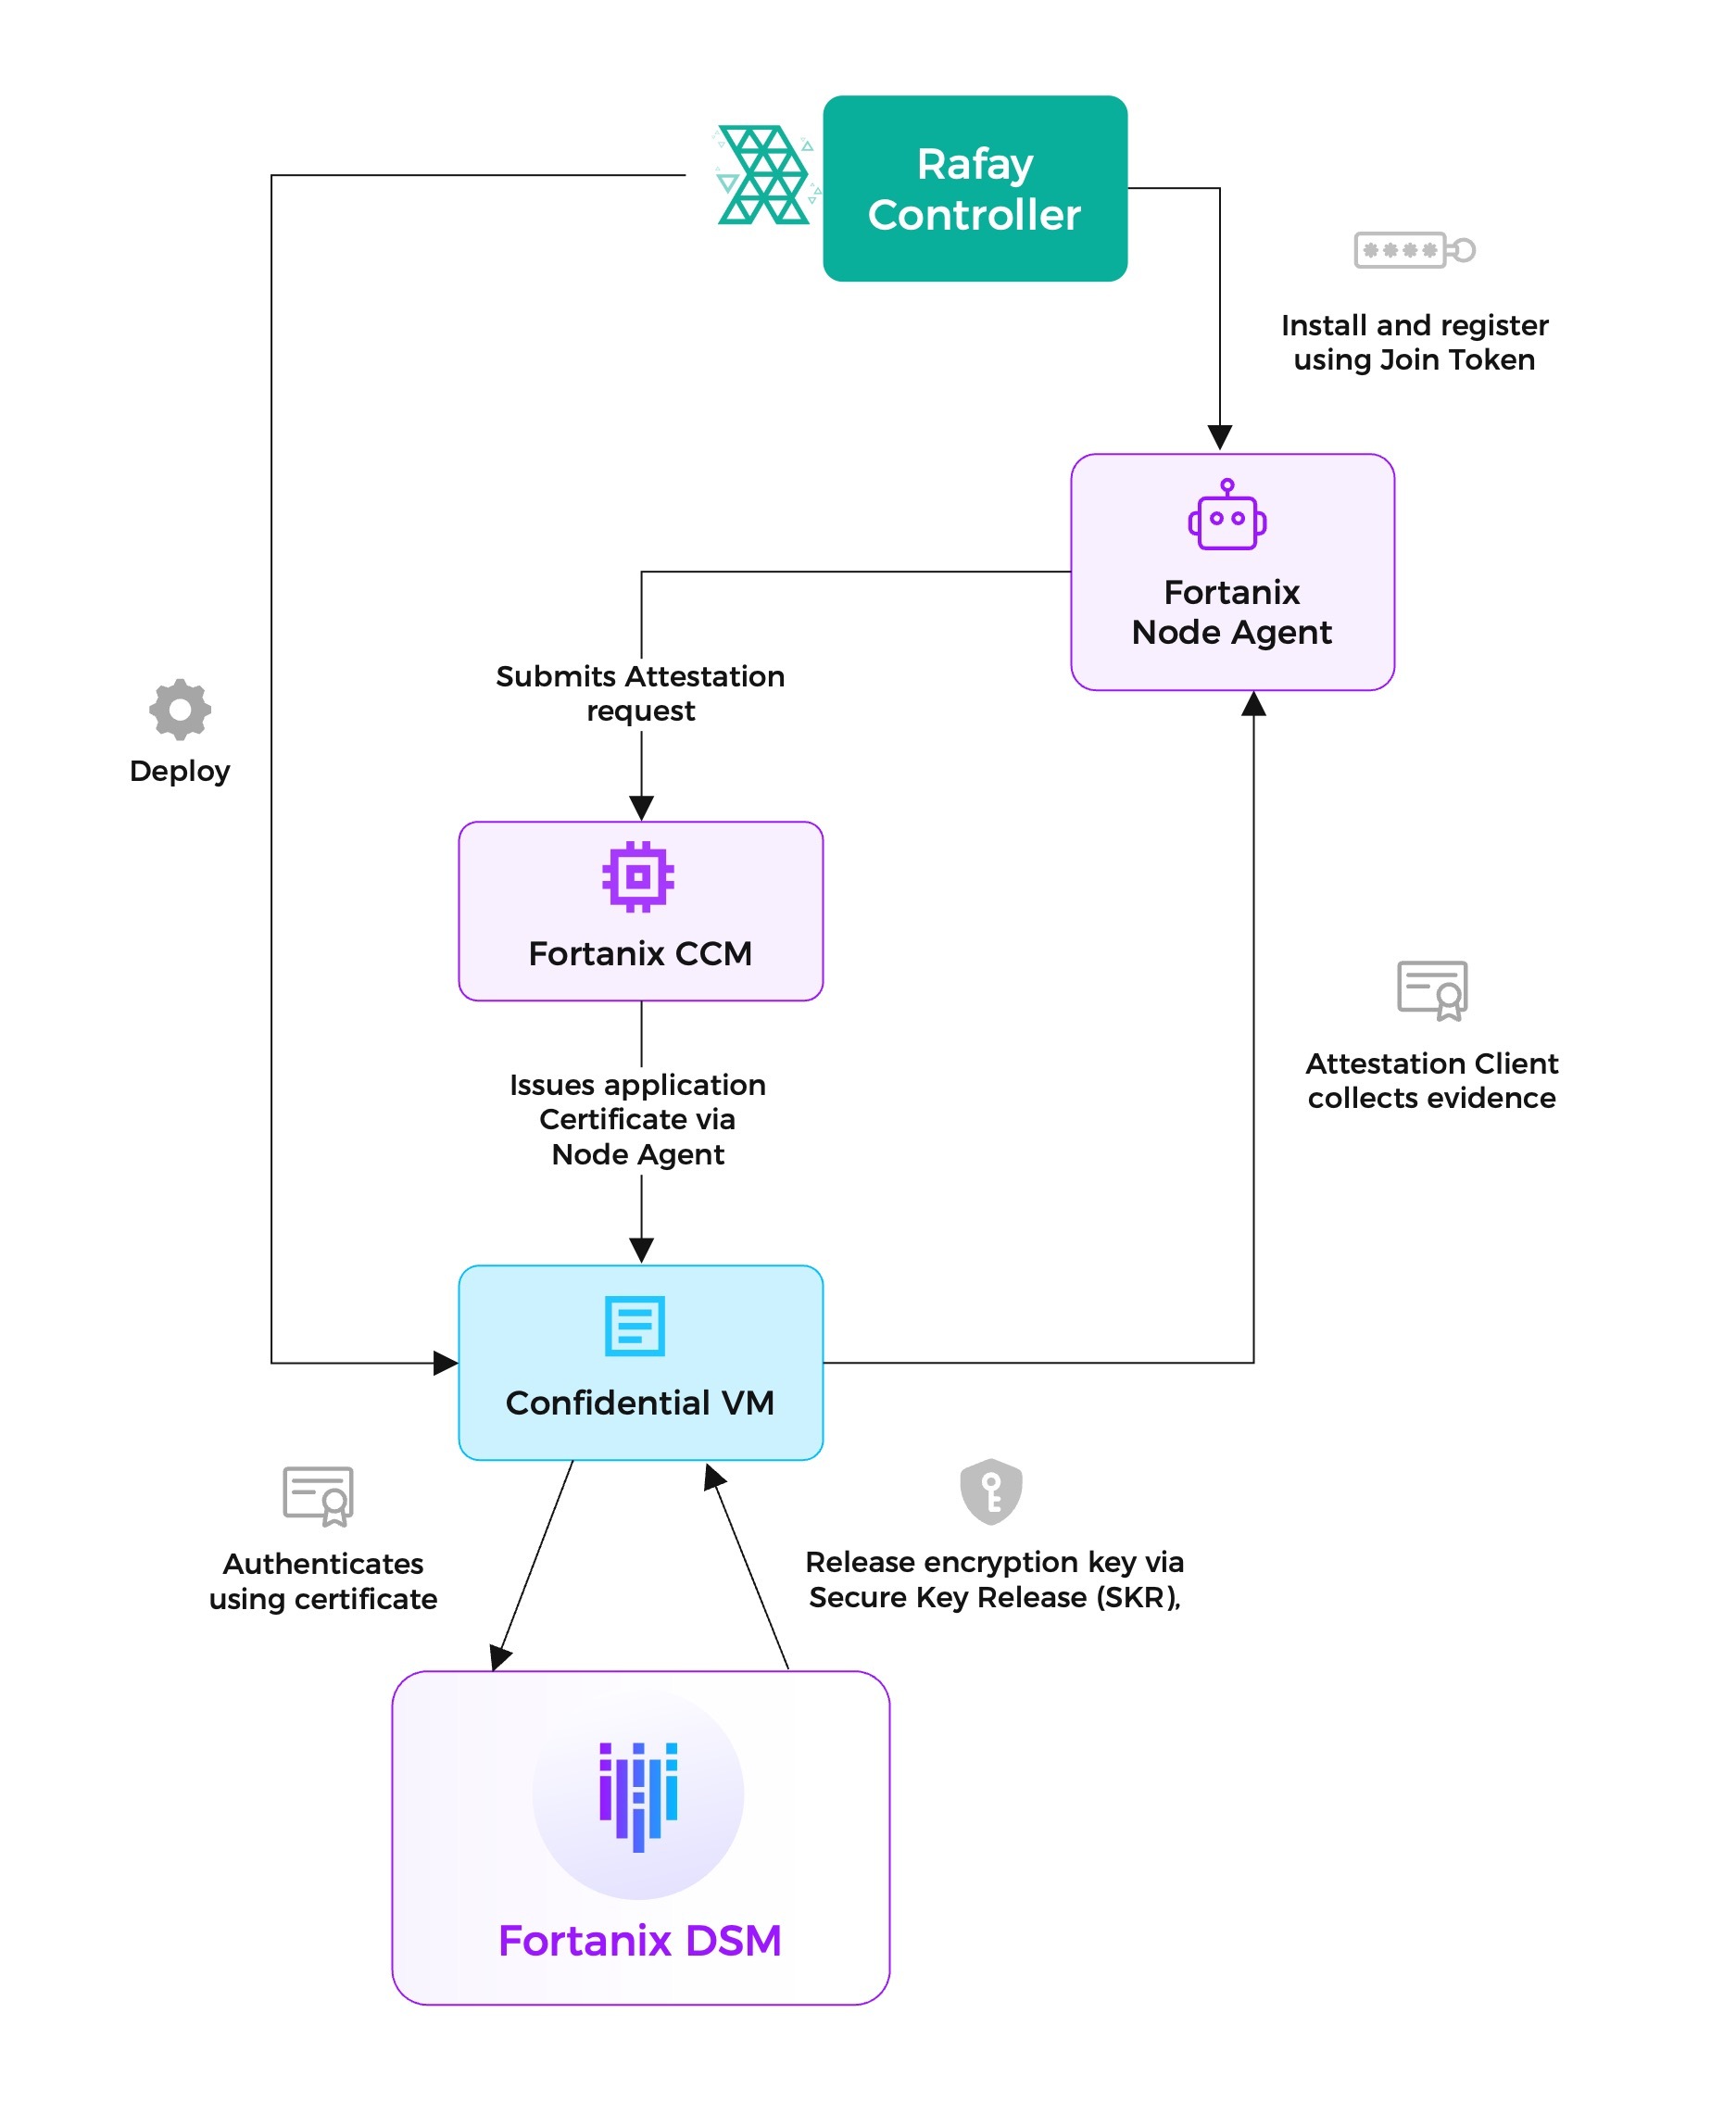
Figure 2: Fortanix Attestation and Secure Key Release flow
When the Confidential VM is deployed, the Fortanix Attestation Client collects attestation evidence and sends it to the Fortanix Node Agent. The Node Agent submits the attestation request to Fortanix CCM. After successful verification, Fortanix CCM issues an application certificate through the Node Agent to the Confidential VM. The Confidential VM then authenticates with Fortanix DSM and securely retrieves the encryption key through Secure Key Release (SKR).
3.5 Configure Rafay
After completing the Fortanix configuration and registering the Confidential VM image in Fortanix CCM, configure Rafay to deploy the Confidential VM that hosts the AI application and encrypted model.
3.5.1 Create a Rafay Organization
Create a Rafay organization to manage the Confidential VM deployment.
For detailed instructions, refer to the Rafay official documentation.
3.5.2 Onboard a Compute Node (NCP Admin)
NOTE
Before onboarding the compute node into Rafay:
Ensure that AMD SEV-SNP or Intel TDX is enabled and that the server meets the platform prerequisites described in Section 2.4: Configure the Platform for Confidential Computing.
Ensure that Confidential Computing (CC) mode is disabled.
Ensure that the GPU is not bound to the
vfio-pcidriver, as Rafay requires access to the GPU throughnvidia-smito discover GPU information during onboarding.After onboarding the compute node into Rafay:
Enable Confidential Computing mode.
Bind the GPU to the
vfio-pcidriver before deploying Confidential VM workloads.
Onboard the physical compute node (server) that will host the Confidential VM into Rafay. After the server is successfully onboarded and available, it can be used to deploy Confidential VM workloads.
For detailed instructions, refer to the Rafay official documentation.
3.5.3 Create a Confidential VM SKU (Enterprise Admin)
Create a Confidential VM SKU in Rafay by associating the Confidential VM image with the corresponding Fortanix CCM application image. For detailed instructions, refer to Rafay official documentation.
When configuring the SKU, specify the following Fortanix CCM connection details in the Input Settings tab:
Fortanix CCM Endpoint:
(2).png?sv=2026-02-06&spr=https&st=2026-11-17T02%3A26%3A40Z&se=2026-11-17T02%3A43%3A40Z&sr=b&sp=r&sig=GWhZdTTBWEzXcN6%2BHE0mUQzX9uvcHqyKLr7%2BvSjFimA%3D)
Figure 3: CCM endpoint
Fortanix CCM Application Domain Name(s):
.png?sv=2026-02-06&spr=https&st=2026-11-17T02%3A26%3A40Z&se=2026-11-17T02%3A43%3A40Z&sr=b&sp=r&sig=B4FW8YEf1zCuv8mgoJm22ufXAEO7rGLuJ4gKWGn%2FwEU%3D)
Figure 4: CCM app domain name
Configure the placeholder fields for Fortanix CCM App Config ID and Fortanix CCM Join Token, these will be used when deploying the CVM. Rafay uses the Join Token to automatically install and register the Fortanix Node Agent with Fortanix CCM on the compute node.
.png?sv=2026-02-06&spr=https&st=2026-11-17T02%3A26%3A40Z&se=2026-11-17T02%3A43%3A40Z&sr=b&sp=r&sig=IDm4DS0U8U93CmSO930vL7S0gy22m5l%2F%2BqdXycsAtow%3D)
Figure 5: CCM configuration
CVM Agent Config:
If you are using Intel TDX bare metal platform, the CVM Agent Config Value must be the following:
[
      {
        "url": "https://node-agent-installer.s3.us-west-1.amazonaws.com/onprem/tdx/latest/Node-Agent-Installer.tar.gz",
        "server_model": "intel"
      }
]
If you are using AMD SEV-SNP bare metal platform, the CVM Agent Config Value must be the following:
[
      {
        "url": "https://node-agent-installer.s3.us-west-1.amazonaws.com/onprem/amd-sev-snp/latest/Node-Agent-Installer.tar.gz",
        "server_model": "amd"
      }
]
CVM Image: Enter the OVMF, EFI, and QCOW2 path of your CVM image.
Following is a sample path:
{ "CVM_OVMF_Path": "/launch_artifacts/OVMF.tdx.fd", "CVM_EFI_Path": "/launch_artifacts/fortanix-demo-cvm-tdx.efi", "QCOW2_Path": "/launch_artifacts/fortanix-demo-cvm-tdx.qcow2" }.png?sv=2026-02-06&spr=https&st=2026-11-17T02%3A26%3A40Z&se=2026-11-17T02%3A43%3A40Z&sr=b&sp=r&sig=a5RysDuj6DVzsdItOP0kD2bG8vxIvPTzEPGCsnihNmc%3D)
Figure 7: CVM image
3.5.4 Deploy the Confidential VM (Enterprise Admin)
Deploy the Confidential VM by selecting the appropriate Confidential VM SKU from the Rafay catalog. Enter the Fortanix CCM App Config ID and Fortanix CCM Join Token before deploying the VM.
.png?sv=2026-02-06&spr=https&st=2026-11-17T02%3A26%3A40Z&se=2026-11-17T02%3A43%3A40Z&sr=b&sp=r&sig=0uJWpoSd%2FIRirM%2FFWUQmybsEY9NKxKib0y0g0xX166Q%3D)
Figure 8: Configure Fortanix CCM join token and CVM app config ID
For detailed instructions, refer to the Rafay official documentation.
3.5.5 Verify the Confidential VM Deployment
Verify that the Confidential VM deployment succeeded in Rafay.
.png?sv=2026-02-06&spr=https&st=2026-11-17T02%3A26%3A40Z&se=2026-11-17T02%3A43%3A40Z&sr=b&sp=r&sig=Nfl%2ByYK%2FzgUgh5XvRncHt%2FxouDFjxqM2hLEpkP1VaHI%3D)
Figure 9: CVM deployed in rafay
.png?sv=2026-02-06&spr=https&st=2026-11-17T02%3A26%3A40Z&se=2026-11-17T02%3A43%3A40Z&sr=b&sp=r&sig=23rX2N143znKSsj0vHV77bPtdwaUKFx7%2FWe6OoKj0vw%3D)
Figure 10: Rafay audit logs
NOTE
The end user can start or stop the deployed CVM in Rafay.
3.5.6 Verify Application Attestation
After the Confidential VM is successfully deployed using Rafay, verify that the Confidential VM was successfully attested and that an application certificate was generated.
In the Fortanix CCM UI, navigate to the application details page.
Verify that the audit log contains a successful
REQUEST_APP_CERTIFICATEevent, indicating that the application certificate was generated following successful attestation.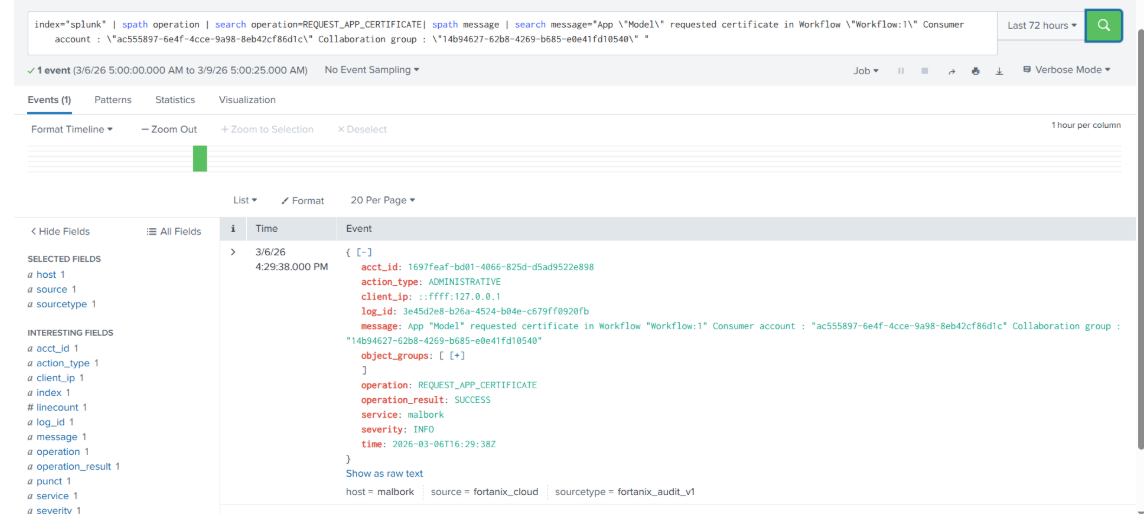
Figure 11: Application audit logs
NOTE
Audit logs are available in the log management system configured for your Fortanix CCM environment.